Wednesday, November 15, 2006
Creating Advanced Custom Search Engines
| John Biundo and Eric Enge of Stone Temple Consulting both worked in the tech industry for over two decades. Eric’s also the creator of the Custom Search Guide. |
|
Google Custom Search Engines (CSE) are designed to be fast and easy to implement, and don’t require any coding, at least for basic features. The Custom Search Engine user interface deliberately keeps things simple, as does the accompanying documentation. It doesn’t take long, though, for the first-time CSE builder to want to exercise finer control over their search engine, and to begin pushing up against the boundaries of the simple CSE control panel. That’s the topic we explore in this post.
This article is not intended as a gentle introduction to CSEs. For that, you may want to start with this overview of Google Custom Search Engines or this article showing how to build a good Custom Search Engine.
Let’s look at an example of customization. With CSEs, it’s easy to say “build me a search engine that searches the entire web, but gives these hand-picked resources (pages, groups of pages, or entire sites – you choose) a ’boost’ in the rankings, so that they tend to show up high on the results page.” In fact, this may be one of the most common use cases, and it’s supported naturally in the basic CSE user interface.
A little experience with the CSE, however, shows that the standard amount of “boost” that you can apply often isn’t enough to help your “weaker” pages (weaker, as in lower ranking in a “normal” Google search) overcome the stronger ones that Google normally ranks highly. The standard boost may indeed help them rank higher in your CSE than they would in a “normal” search, but often they’re not boosted high enough, and they can still be lost in the sea of results past the first page or two. Thankfully, CSEs provide a way to custom tune the amount of boost. To take advantage of this feature, you need to delve into the land of XML annotations.
A little Google Co-op background is in order before we go further. Many people may not realize that CSEs are built on top of the extremely powerful Google Co-op Topics “engine.” Some of the advanced functionality of Co-op Topics is hinted at, but not really directly exposed, in the CSE docs and user interface. To get at this functionality, you must understand several more advanced topics, and must also be willing to get your hands dirty with a little bit of XML code.
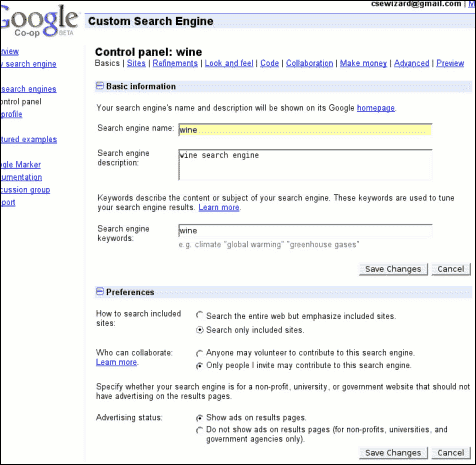
Specifically, you need to develop an understanding of what’s happening on the “Advanced” page of the Google CSE control panel, the land of context files and annotation files. This is not “rocket surgery” (as usability expert Steve Krug would say), but it’s somewhat more involved than filling in forms. It’s probably on the order of difficulty of creating your first web page, learning basic CSS, or writing Excel spreadsheet macros.
A custom wine search engine
Let’s start with a simple CSE, one that will help us explore the world of wine. If you’re following along, now is the time to go create a CSE just like the one we’re using. To do that, create a new CSE with the following sites. To be sure to get the same results we’ll show here, specify “wine” (no quotes) for your “Search engine keywords”, and check “Search only included sites.”
http://en.wikipedia.org/wiki/Wine
http://www.winespectator.com/Wine/Home/
http://www.wineloverspage.com/
http://www.wine-searcher.com/
http://www.intowine.com/
http://www.wineinstitute.org/
http://www.winemag.com/homepage/index.asp
http://www.erobertparker.com/
http://www.tasting-wine.com/
http://www.winebusiness.com/
http://www.terroir-france.com/
Let’s try out a query. Go to your new Custom Search Engine’s homepage and search for “tasting” (no quotes). You should see results very similar to those shown below.

Let’s assume that these results seem pretty reasonable, but that when we look closely, we decide we’d like to make some adjustments. For example, the first result under “tasting” is from Wikipedia, and while of good quality, we think that the 5th result, labeled “Tasting wine: tasting techniques...” is a better choice. Since this is a custom search engine after all, we should be able to adjust these results as we see fit.
In order to make this kind of adjustment, we need to roll up our sleeves and take a look at what makes this CSE tick. Let’s start by going to the “Advanced” page of the Control panel, where we find sections devoted to “Annotations” and “Context.” Let’s get familiar with these entities, one at a time. A context contains the structural definition of a Custom Search Engine, viewable in text form (specifically, in an XML representation). It contains almost all of the visible stuff you entered in the “New search engine” wizard, such as the name, description, keywords, etc. What it does not contain is any information about the specific sites you’ve included (dramatic foreshadow: remember this factoid when we talk about “Annotations” a little bit later). The easiest way to see a context is to simply click on the “Download” link (shown just above the yellow “warning area” on the bottom half of the page). When you do this, you’ll see something like this in your browser window:
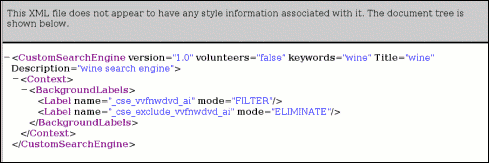
Let’s go ahead and save this XML to a file. This will allow us to edit the context definition and upload our changes back to Google, giving us complete control over the process of customizing our search engine. To save the context to a file (these instructions are for Firefox; your steps will differ slightly for IE), simply click on File->Save Page As, and choose a filename and directory to save the file in. The filename wine-context.xml is a reasonable choice.
Hint: while the link labeled “download” strongly implies saving a file somewhere, that’s a bit misleading. You can always come back and click on this link and simply display the XML in your browser, as you did a moment ago, without any intention of saving anything. This is often a quick way to see the details of how your CSE is structured. I try to think of “download” here as more like “preview,” which reminds me that it’s an easy way to simply view my XML – a useful function when customizing a CSE!
After saving the context file, let’s once again look at it in our browser. All default context files are going to have a section called <Background Labels> that looks something like the one you’re looking at. Background labels are where you define the basic controls you have at your disposal for customizing your search engine. Think of a context file as a place where you can create new “knobs and switches,” such as one for deciding whether or not a page (actually, a URL) appears in your CSE results, one for determining whether or not its ranking in the result list gets promoted or demoted, etc. Let’s make the connection: if you want to include a URL (or set of URLs) in your CSE, you’ll tag (or “annotate”) the URL(s) with the first label, the one with the mode="FILTER” setting. This tells the CSE to include these URL(s) in the search results if they match the user’s query. If you want to exclude URLs, they must be tagged with the second label, the one with the mode="ELIMINATE” setting. We’ll talk a lot more about how you actually go about annotating URLs in a moment.
For now, let’s study the context file a bit more. The background labels that appear in our context file were determined by one of the choices made when the CSE was created (this setting is also shown on the “Basics” page of the control panel, shown below). Choosing “Search only included sites,” as we did, produces the “FILTER” and “ELIMINATE” background labels, labels that are useful for this “gross level adjustment” of including or excluding pages and sites. We can apply these labels to any pages we want, thereby tagging them to either be included or excluded from our CSE.
Let’s see what happens when we instead choose “Search the entire web but emphasize included sites” (go ahead and make this change on the “Basics” page of the Control Panel). Now, viewing the context file by once again clicking on “download” from the Advanced page, we see a slightly different set of background labels, reflecting a slightly different goal. Below we show the context file, with the background labels that result from this choice (if you’re following along at home, your label names, which are generated uniquely for each user and CSE by Google, will be slightly different):
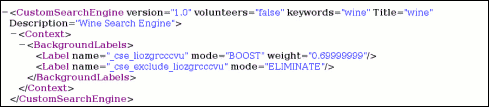
In this case, we’ve told Google that we want our CSE to include the entire web (and this is an implicit function, so there’s no need for a label like “FILTER” to include sites), but we want to emphasize certain sites. For the emphasized sites, we’re going to apply the “BOOST” label. You can see that the “BOOST” label also has a “weight” attribute, and the default value for this is “0.69999999”. This brings us back to our initial requirement: how do we assign a higher level of boost to certain pages? It’s pretty obvious that this is going to be done by changing the “weight” attribute, and it turns out that weights can have values between -1.0 and +1.0. Furthermore, a negative weight is used to imply a “demotion,” that will de-emphasize (in the results) URLs that it’s applied to, and a positive weight is a “promotion,” which will emphasize URLs. So the solution to our problem is simple: to get higher boost, we need to set a higher weight on our “BOOST” label.
Thinking about this for a moment, we can see that it’s not enough to just raise the weight value on the BOOST label, for that would emphasize all of our “boosted” sites by the same amount. Instead, what we need is some granularity – the ability to apply different weights to different URLs, so that we can raise or lower them individually. The solution to this is straightforward: we need to create multiple background labels, each with mode="BOOST”, but with different weights.
Adjusting the filter
There’s one more subtle point we need to cover before we can assemble all the pieces. It turns out that we glossed over the “FILTER” mode when we introduced it earlier and said that it’s used to include URLs in a CSE. What FILTER actually does is this: it tells the Custom Search Engine to only include URLs that have been labeled with the FILTER label. That is, it’s a strict filter: only labeled URLs show up, and all others are “filtered” out. This is how Google implements the ability to limit a CSE’s search scope to only selected sites. If we look closely at our second context file, we note that it has a BOOST and an ELIMINATE label, but no FILTER label. This makes sense because this is the context file that we would use for searching the whole web (except for those sites that we might explicitly exclude, hence the need for the ELIMINATE label) while “boosting” our selected sites.
To get the fine-grained adjustments we want, it’s helpful to list our requirements out like this:
- include only URLs that I’ve labeled for inclusion
- boost certain URLs that I’ve labeled for promotion
- exclude certain URLs that I’ve labeled for exclusion
Having done this, it’s clear we need three “knobs,” or background labels. We can now write the XML for these background labels:
<Label name="_cse_vvfrmdvd_ai” mode="FILTER" />
<Label name="boost-high” mode="BOOST” weight="1.0" />
<Label name="_cse_exclude_vvfrmdvd_ai” mode="ELIMINATE" />
For the moment, please simply accept the label names we chose. We’ll explain them in a few minutes. You’ll notice that we simply used the existing labels from our very first example (the default context file generated when we selected “Search only included sites”), and added a new one with our “custom boost.” Now we can put all the pieces of the context file together, which we show below. If you’re following along with this tutorial, be sure to edit your wine-context.xml file and make it look exactly like this (your label names will be slightly different, since Google generates unique labels for each CSE). All you’re actually doing is adding the line with the BOOST label to your original context file. Add this line exactly as shown.

Once we’ve saved the context file, we need to make these labels known to our CSE by uploading them. As you might expect, you do this on the Advanced page of the Control Panel, in the “Context” section on the bottom half of the page, using “Browse” (to select your modified context file) and “Upload” to perform the upload. Google checks the format and contents of your file, and will notify you whether it successfully uploaded it, or found problems. If Google finds a problem, there’s a good chance it’s due to a missing or misplaced character, typically a “<”, “>”, "/”, or “,” in your file.
Annotating with labels
We’re now going to talk about how to use these labels. This is where we return to the concept of “tagging” or “annotating” that I referred to a few minutes ago. Normally, annotating goes on mostly “behind the scenes” as an implicit part of other activities. If you’ve created a CSE, you’ve already been annotating URLs in one of several different ways, even though you may not have recognized it as such:
- Implicitly on the “Sites” page of the CSE control panel: including a site tags it with the “FILTER” label, telling the CSE to include the site (its URLs) in results; excluding a site tags it with the “ELIMINATE” label.
- Explicitly, with the Google Marker bookmarklet, which allows you to apply labels, on the fly, as you browse pages on the web.
Annotation files
It turns out there’s yet another way – one that is far more flexible than the other two, but at the cost of being a little bit more complex and error-prone. You can do your tagging in an “annotation file,” which is an XML or tab-delimited representation of the tag/URL combinations, with a text editor (e.g., Windows notepad). Once created, the annotation file can be easily uploaded to the Google server. Annotations are pretty easy to understand: here’s an example of the annotation we’ll use to boost our preferred wine tasting page in our Wine CSE (XML version).
<Annotation about="www.tasting-wine.com/*” >
<Label name="boost" />
</Annotation>
The annotation has two key parts: the URL (or URL pattern) being labeled, which is specified in the about attribute of the <Annotation> element, and the label, which is specified by name in the <Label> element. So this annotation assigns our “boost” label to the “www.tasting-wine.com/*” URL pattern (this pattern matches all URLs on the www.tasting-wine.com/ domain). It specifies that all URLs coming from this domain should receive our custom boost, which is weighted at 1.0 (as defined in our context file).
Individual annotations must be contained within an annotation file, which has a specific format. A complete annotation file is shown below. Fortunately, it turns out that we don’t have to write this annotation file from scratch. As I mentioned, anything you do with URLs in a CSE is really supported, often “under the covers,” by annotation. For example, when you add sites on the sites page of the Control Panel, or through the Google Marker bookmarklet, this is really just an easy way of adding an annotation. These existing annotations can be downloaded and edited in a text editor, in much the same way that we did with the context file.
Let’s go ahead and download the existing annotations that were automatically created for us when we first specified the wine CSE. You’ve probably already anticipated how to do this: from the Advanced page. The link to do this is a little bit buried on the page. Look for the sentence that says “Download all your current annotations in the TSV format or XML format.” at the top of the upper light gray area of the page, and click on the XML format link. As with the context file, the XML is displayed in your browser and can be saved to a file. Do so now, saving the file as something like “wine-annotations.xml”. Using a text editor, modify the annotation file by inserting the <Label name="boost" /> phrase for the existing <Annotation about="www.tasting-wine.com/*” > element. When you’re done, the modified annotation file should look like the file shown below (note: except for the “boost” label, which should be identical, your label names will be slightly different because they were uniquely generated by Google). The section of the file that I modified is highlighted.
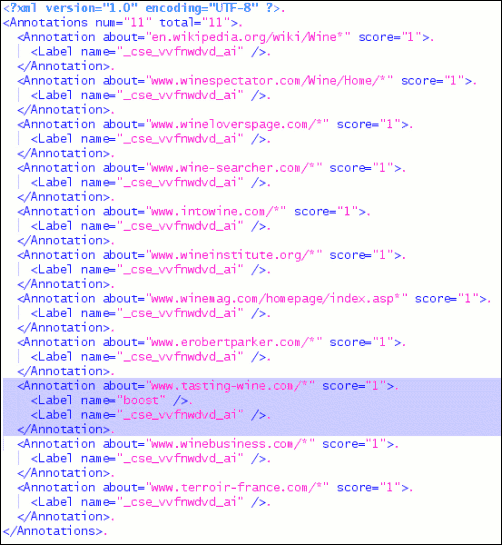
We should be able to just upload this file, and have it replace our existing annotations. While I was working on this article, however, I found that this action didn’t always produce the desired results (this may be a short-term bug). Just to be sure, we’re going to delete our existing annotations before uploading. To do this, go to the Sites page and delete all sites. (Note: be careful working on your own CSE; once you delete sites from the Sites page, you cannot recover them). Now return to the Advanced page, and using the “Browse” and “Upload” buttons in the “Annotations” section, find and upload the wine-annotations.xml file.
Testing our CSE
It’s now time to try out a search on our newly customized engine. Go to the Preview page and search on “tasting”. You should get results like those shown below, with our preferred wine tasting site boosted to the top of the results:
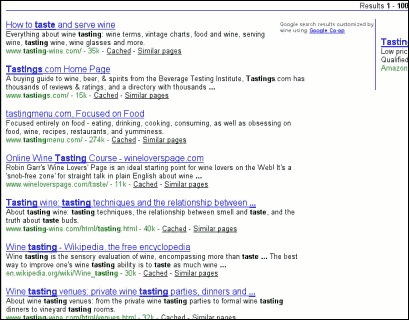
If all went according to Hoyle, you’ve now successfully tuned your CSE to provide a boost to a particular set of URLs (all those coming from the www.tasting-wine.com domain). You can, of course, tune at an even finer level of granularity, in several ways. You can use more specific URL patterns, including fully specifying a web page and applying a boost to that page. You can also create multiple different labels, each with a different level of boost, and selectively apply these labels to different URLs and URL patterns, as appropriate.
At this point, you have all the tools you need to experiment with different “boost weights.” Adjusting results (promoting and demoting URLs) is not an exact science, but with a little practice and experimentation, you should be able to have the kind of influence over the results page that you want.
Also see more Custom Search Engine tips & tricks.
>> More posts
Advertisement
This site unofficially covers Google™ and more with some rights reserved. Join our forum!